This is a photo I enjoy strictly based on content. This is one BA animal!
Editing Software
I have made the switch to Lightroom 5 and it is incredible!
When I began photography as a hobby, I started by editing my photos in Apple iPhoto that came for free on the MacBook Air. As someone who was unfamiliar with photography, this software was an excellent starting point for applying basic (very basic) raw editing. It allowed me to become familiar with the basic sliders present for manipulating my files.
However, I quickly felt limited by this software. I made the decision to upgrade to Apple Aperture. Aperture was an appealing option, as it shares a photo library with iPhoto and I was able to retain the edits that I had already made and continue to go back and work on the images. Aperture has much more powerful tools for manipulating images than the basic software that came with my Mac. The adjustment brushes were revolutionary for me, allowing me to selectively edit photos. When Apple announced that they would be discontinuing the Aperture line of software I was very disappointed. The software was intuitive and easy to use coming from iPhoto, but was already outdated at the time I purchased it (March 2014). The biggest downfalls of Aperture was that that it did not have an independent slider for whites, did not have gradient filters, had poor noise reduction capabilities, and lacked lens correction options.
Recently I have joined team Lightroom. I made the decision to buy the software instead of going the Creative Cloud route. While the Creative Cloud option is attractive because it would have also given me access to Photoshop, at this point in time I do not want an additional monthly bill. Much like the switch from iPhoto to Aperture, the switch from Aperture to Lightroom was revolutionary. There is a free plugin that allows iPhoto/Aperture users to migrate their library to Lightroom from Adobe, but I decided to go the route of exporting my raw files (originals) to an external hard drive, and then only import the files I want to work with a few at a time into Lightroom. Immediately I was happier with the outcomes I was able to achieve in Lightroom, most notably in my night photography shots. For anyone interested in Lightroom it is a no brainer and I should not have waited so long.
Most importantly, as with anything photography related, learning to utilize the tools we have access to will make the biggest difference in the final outcomes we achieve. I identified now as the right time to upgrade due to my preference for being indoors during the cold Buffalo winter, and my desire to learn more to improve my images.
Initial Review of TriggerTrap MD3 and Flash Adapter
Using Sound to Trigger the Flash for High-Speed Photography
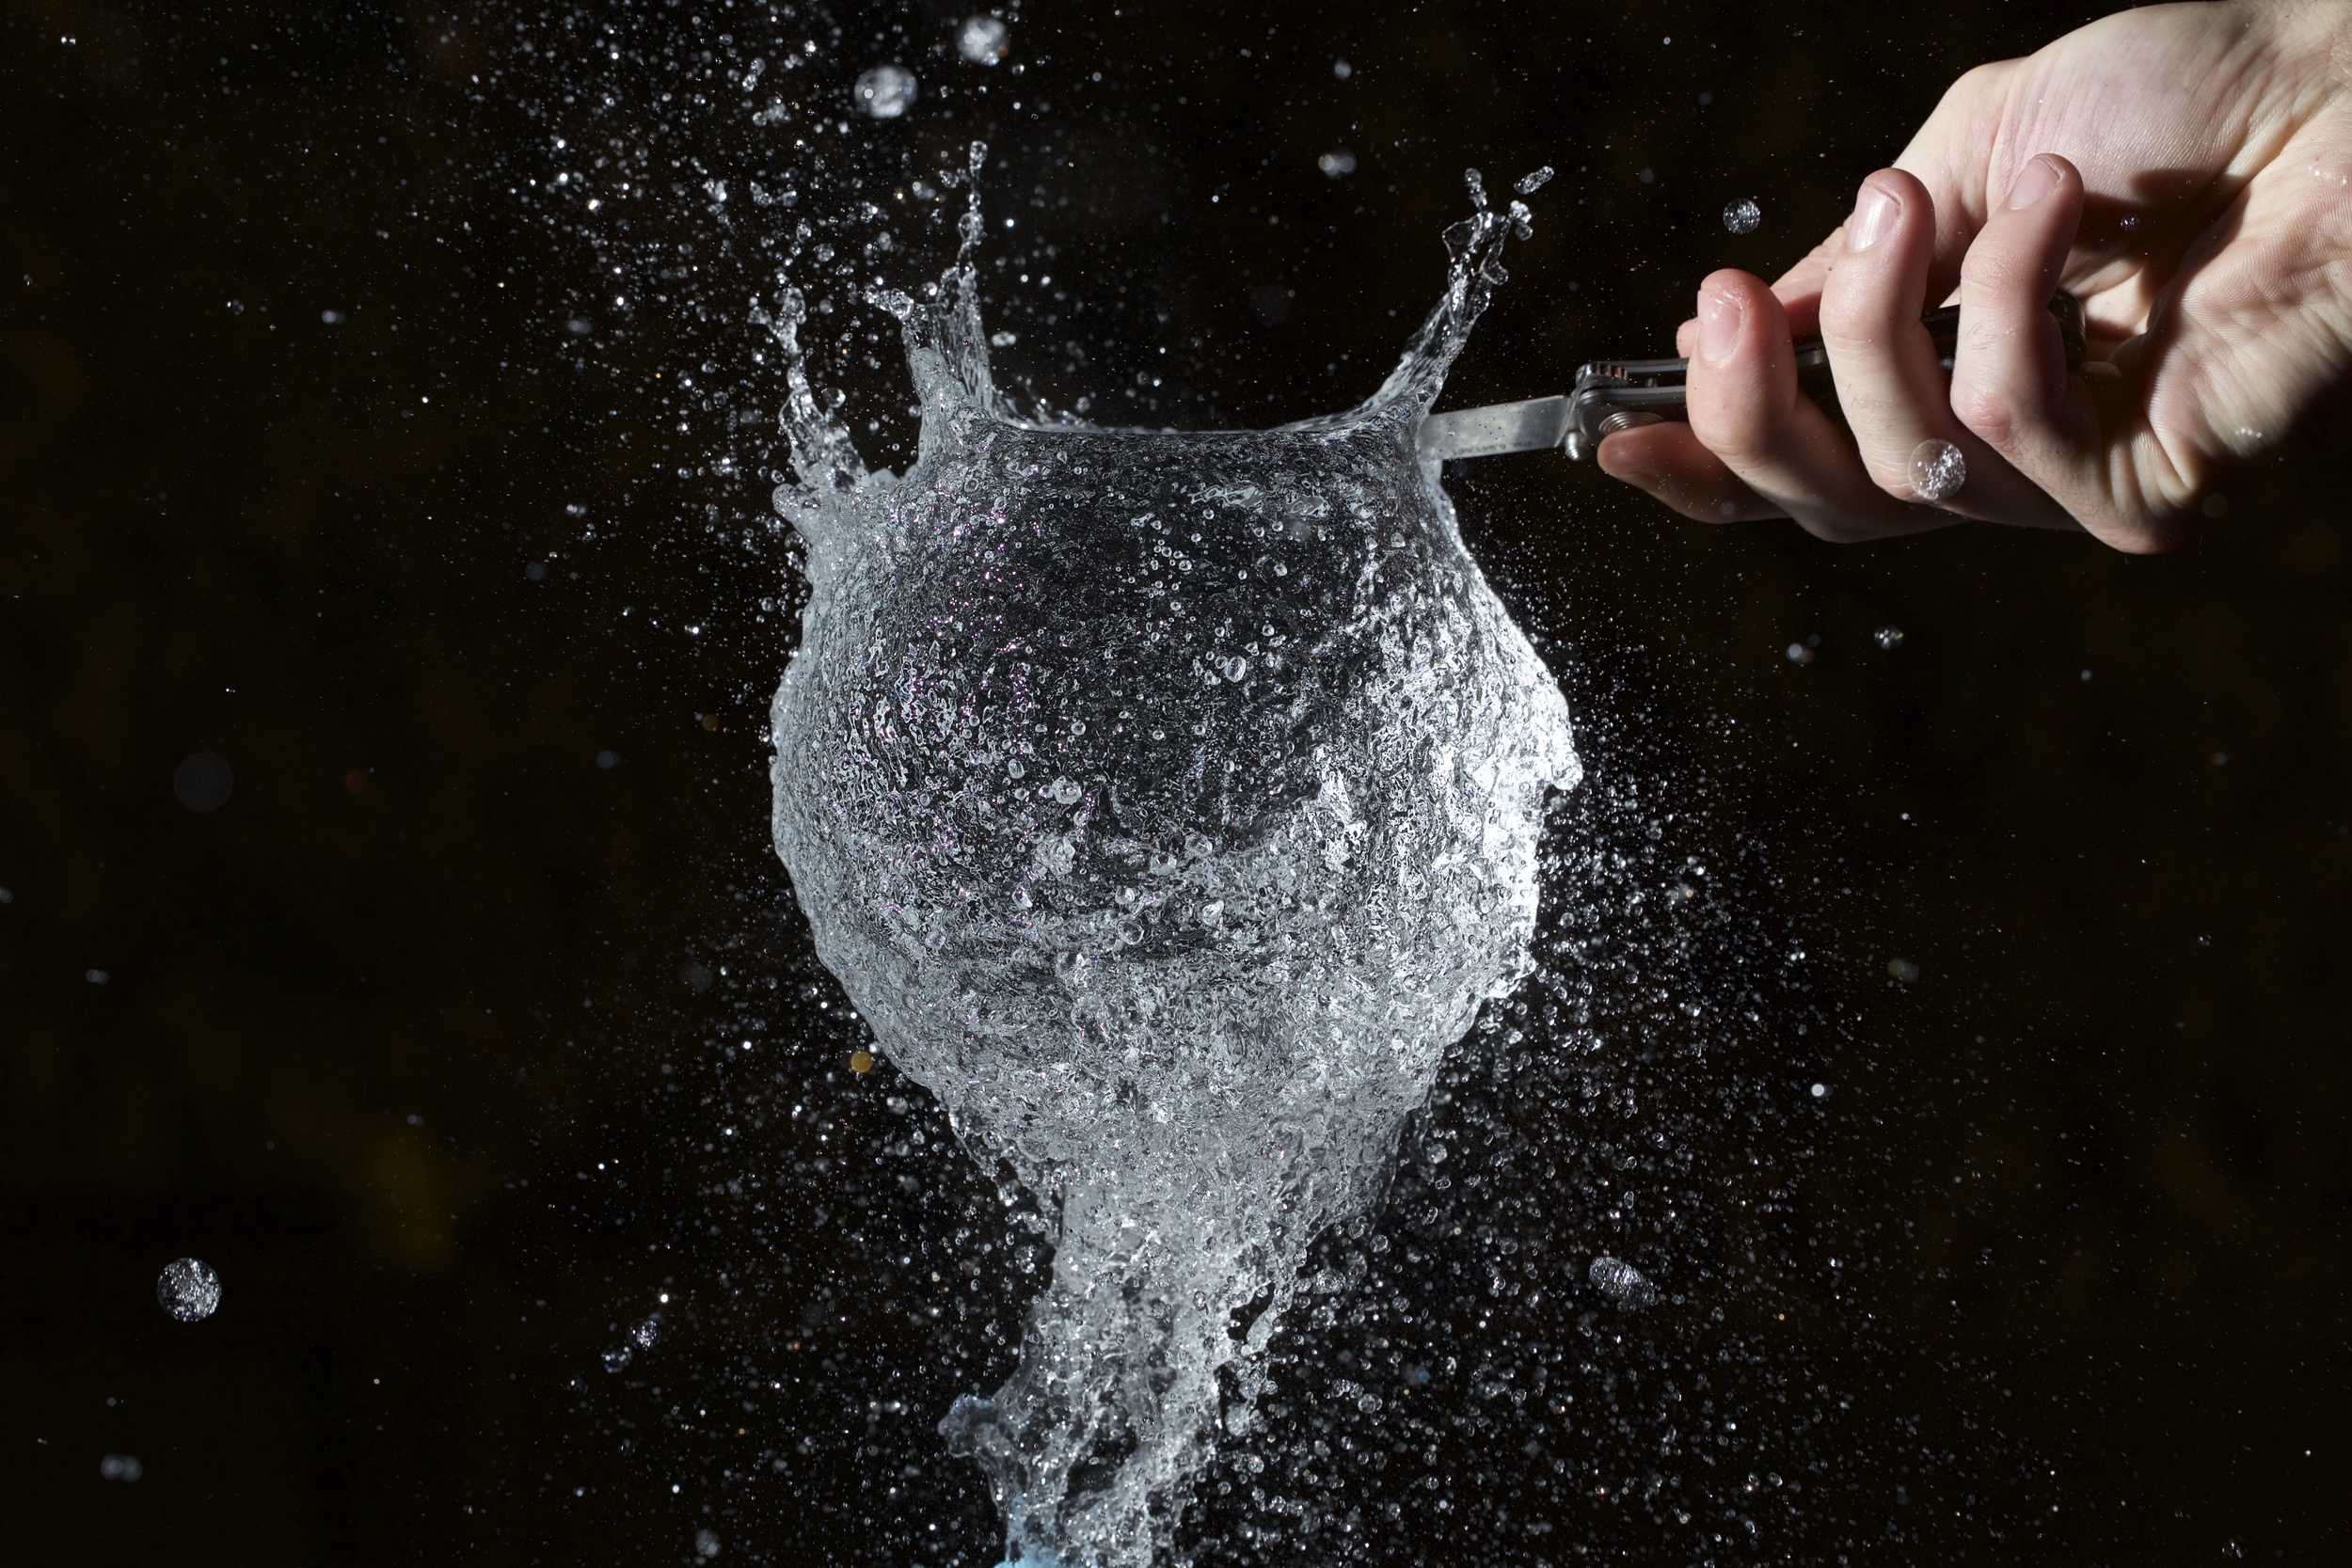
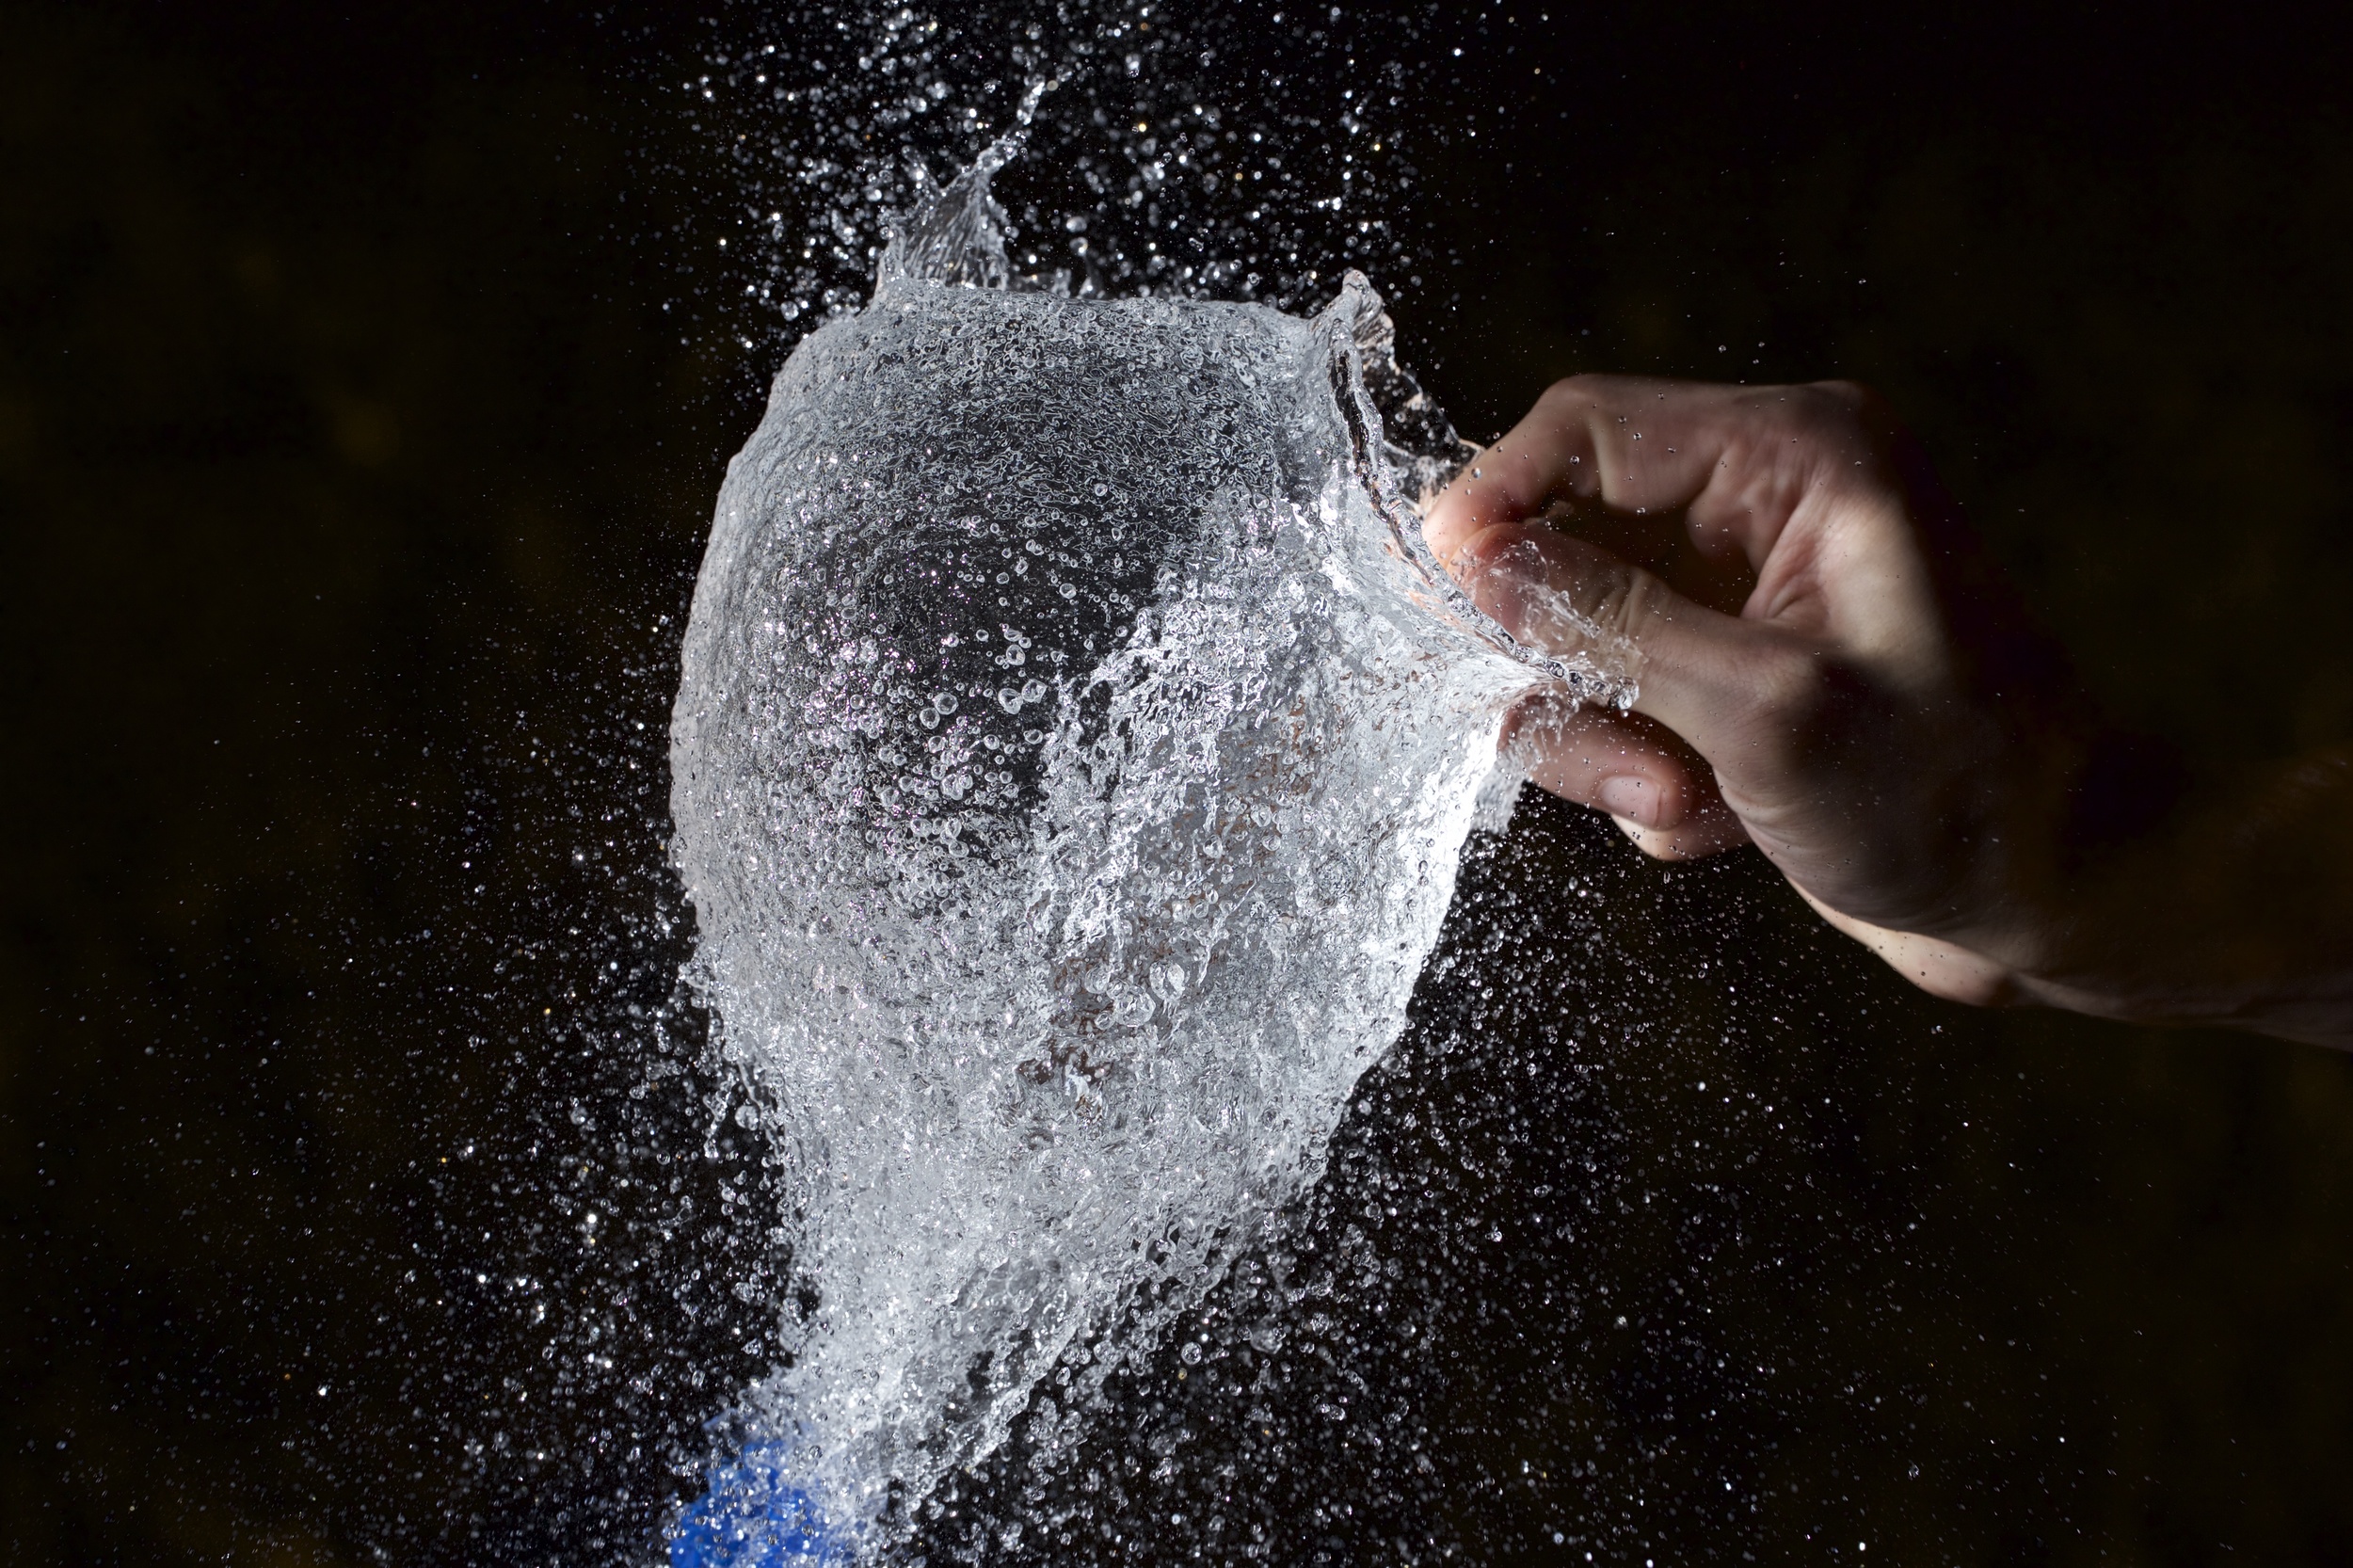
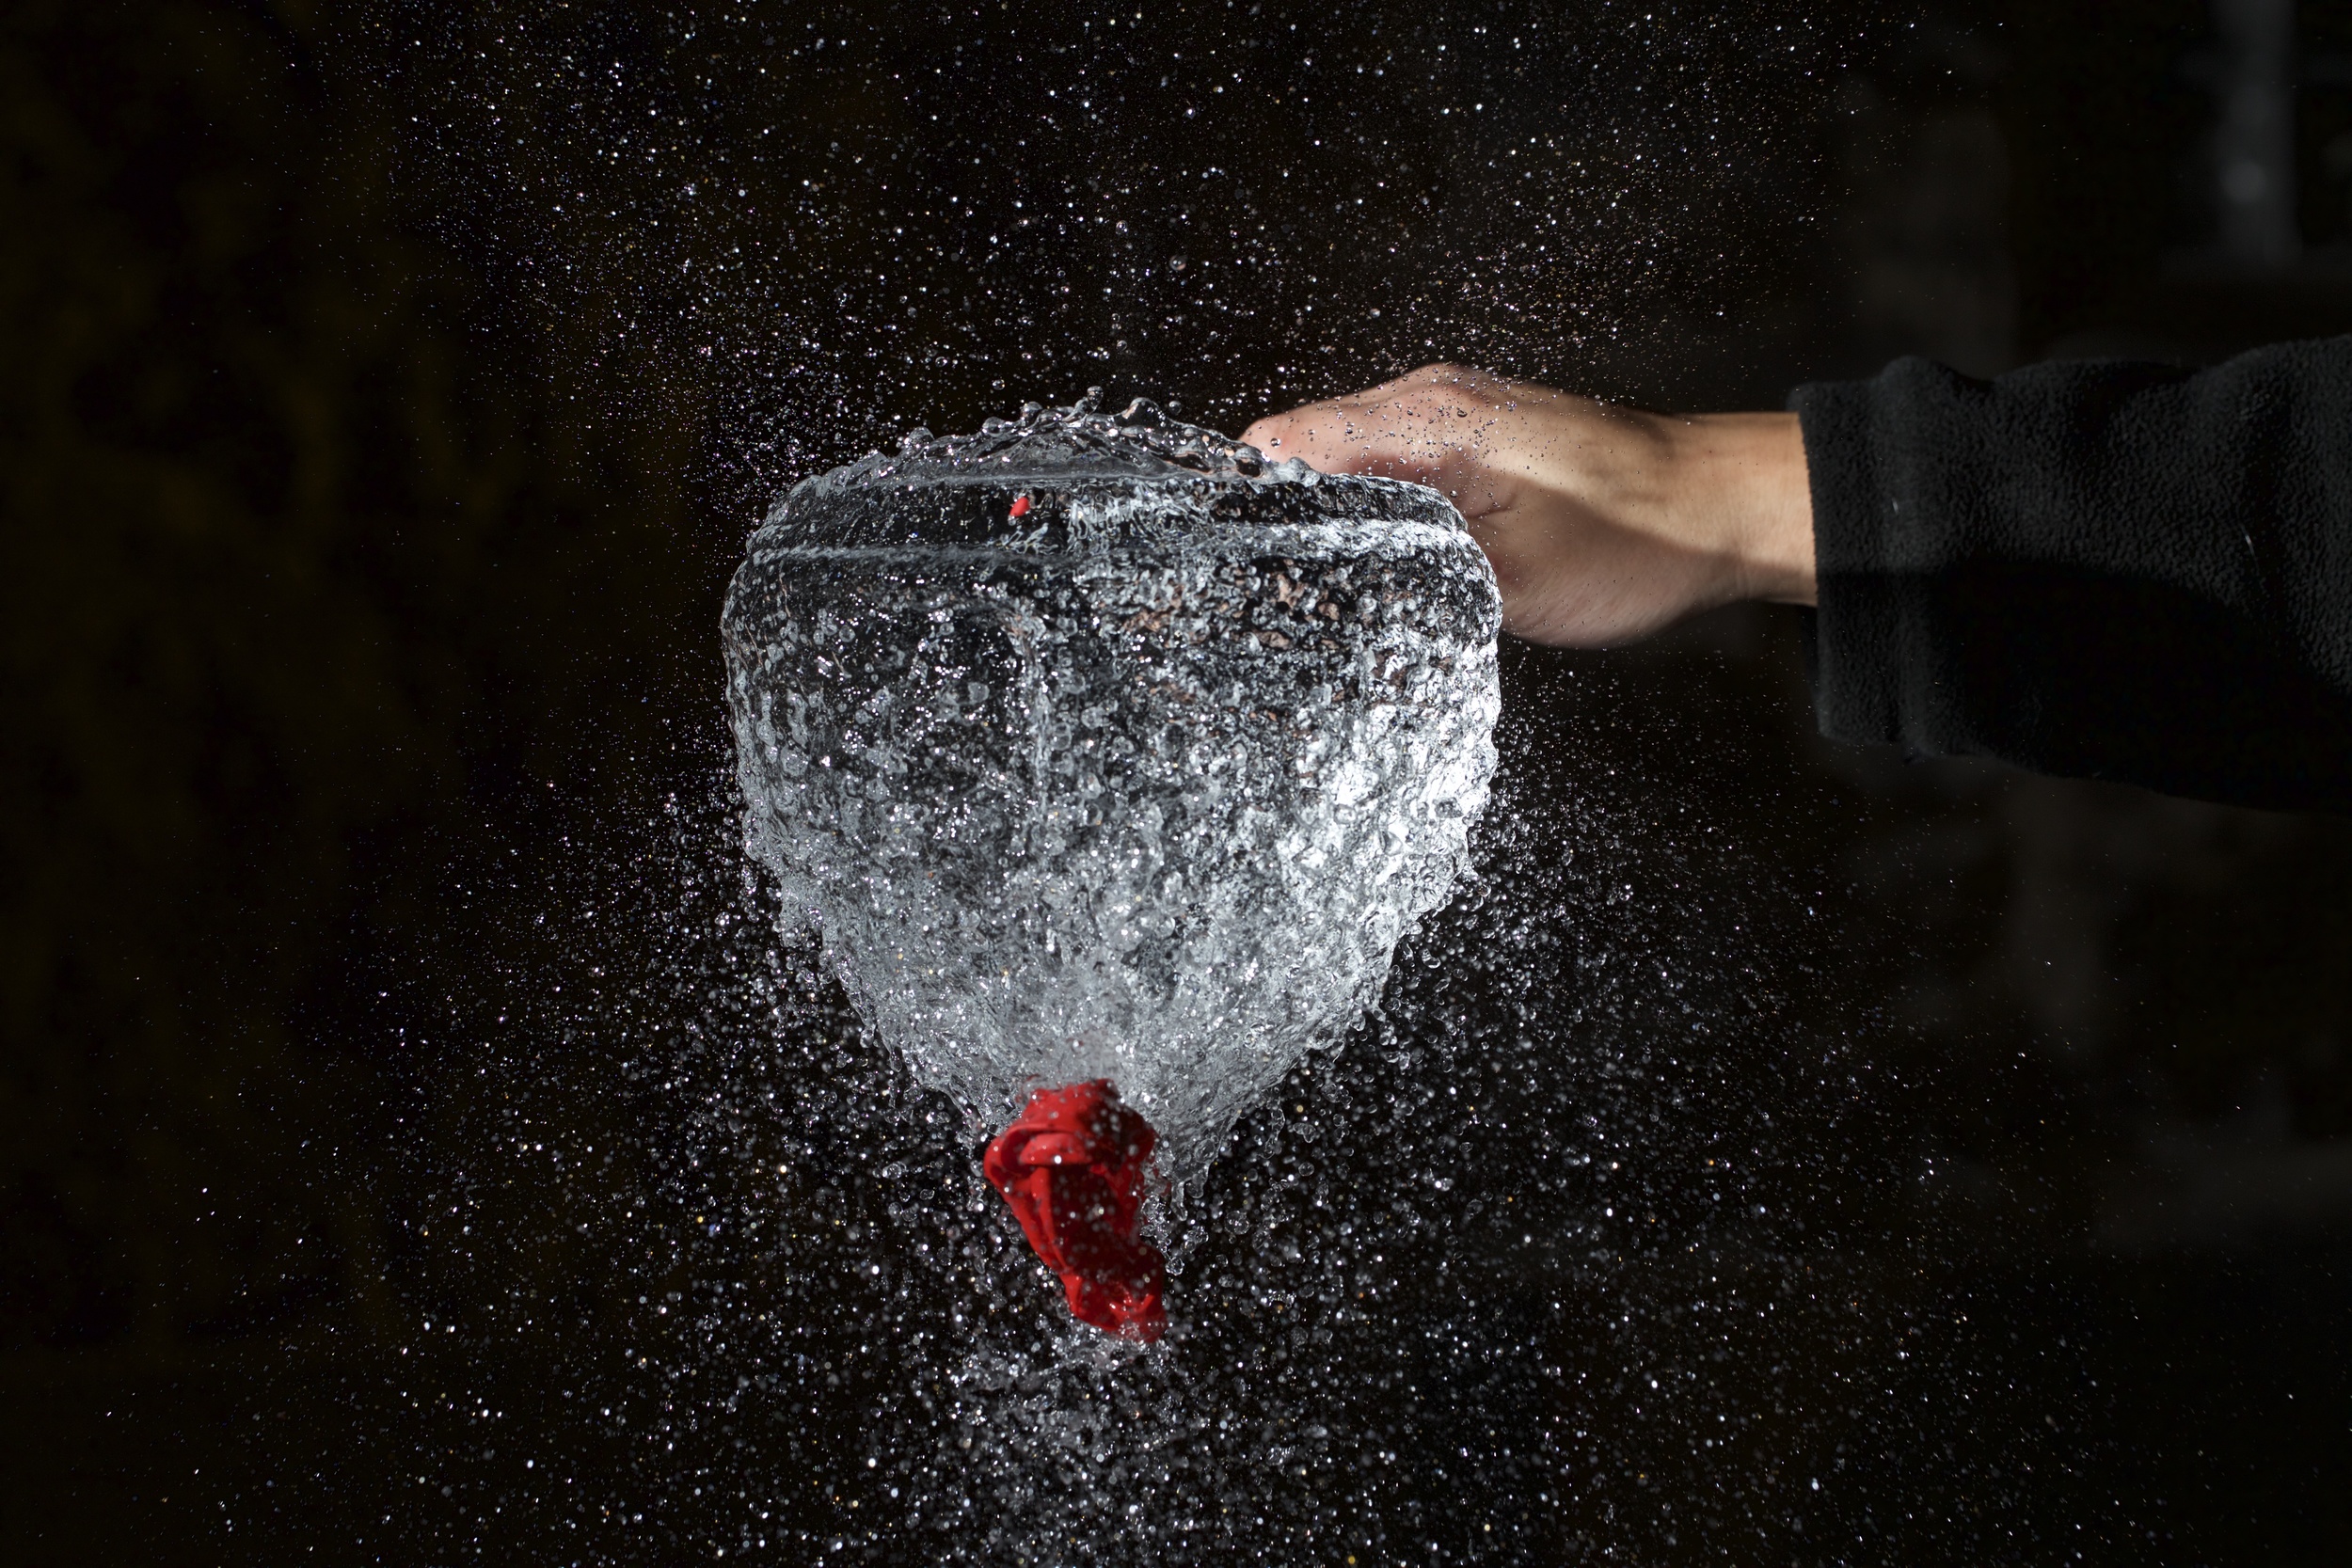
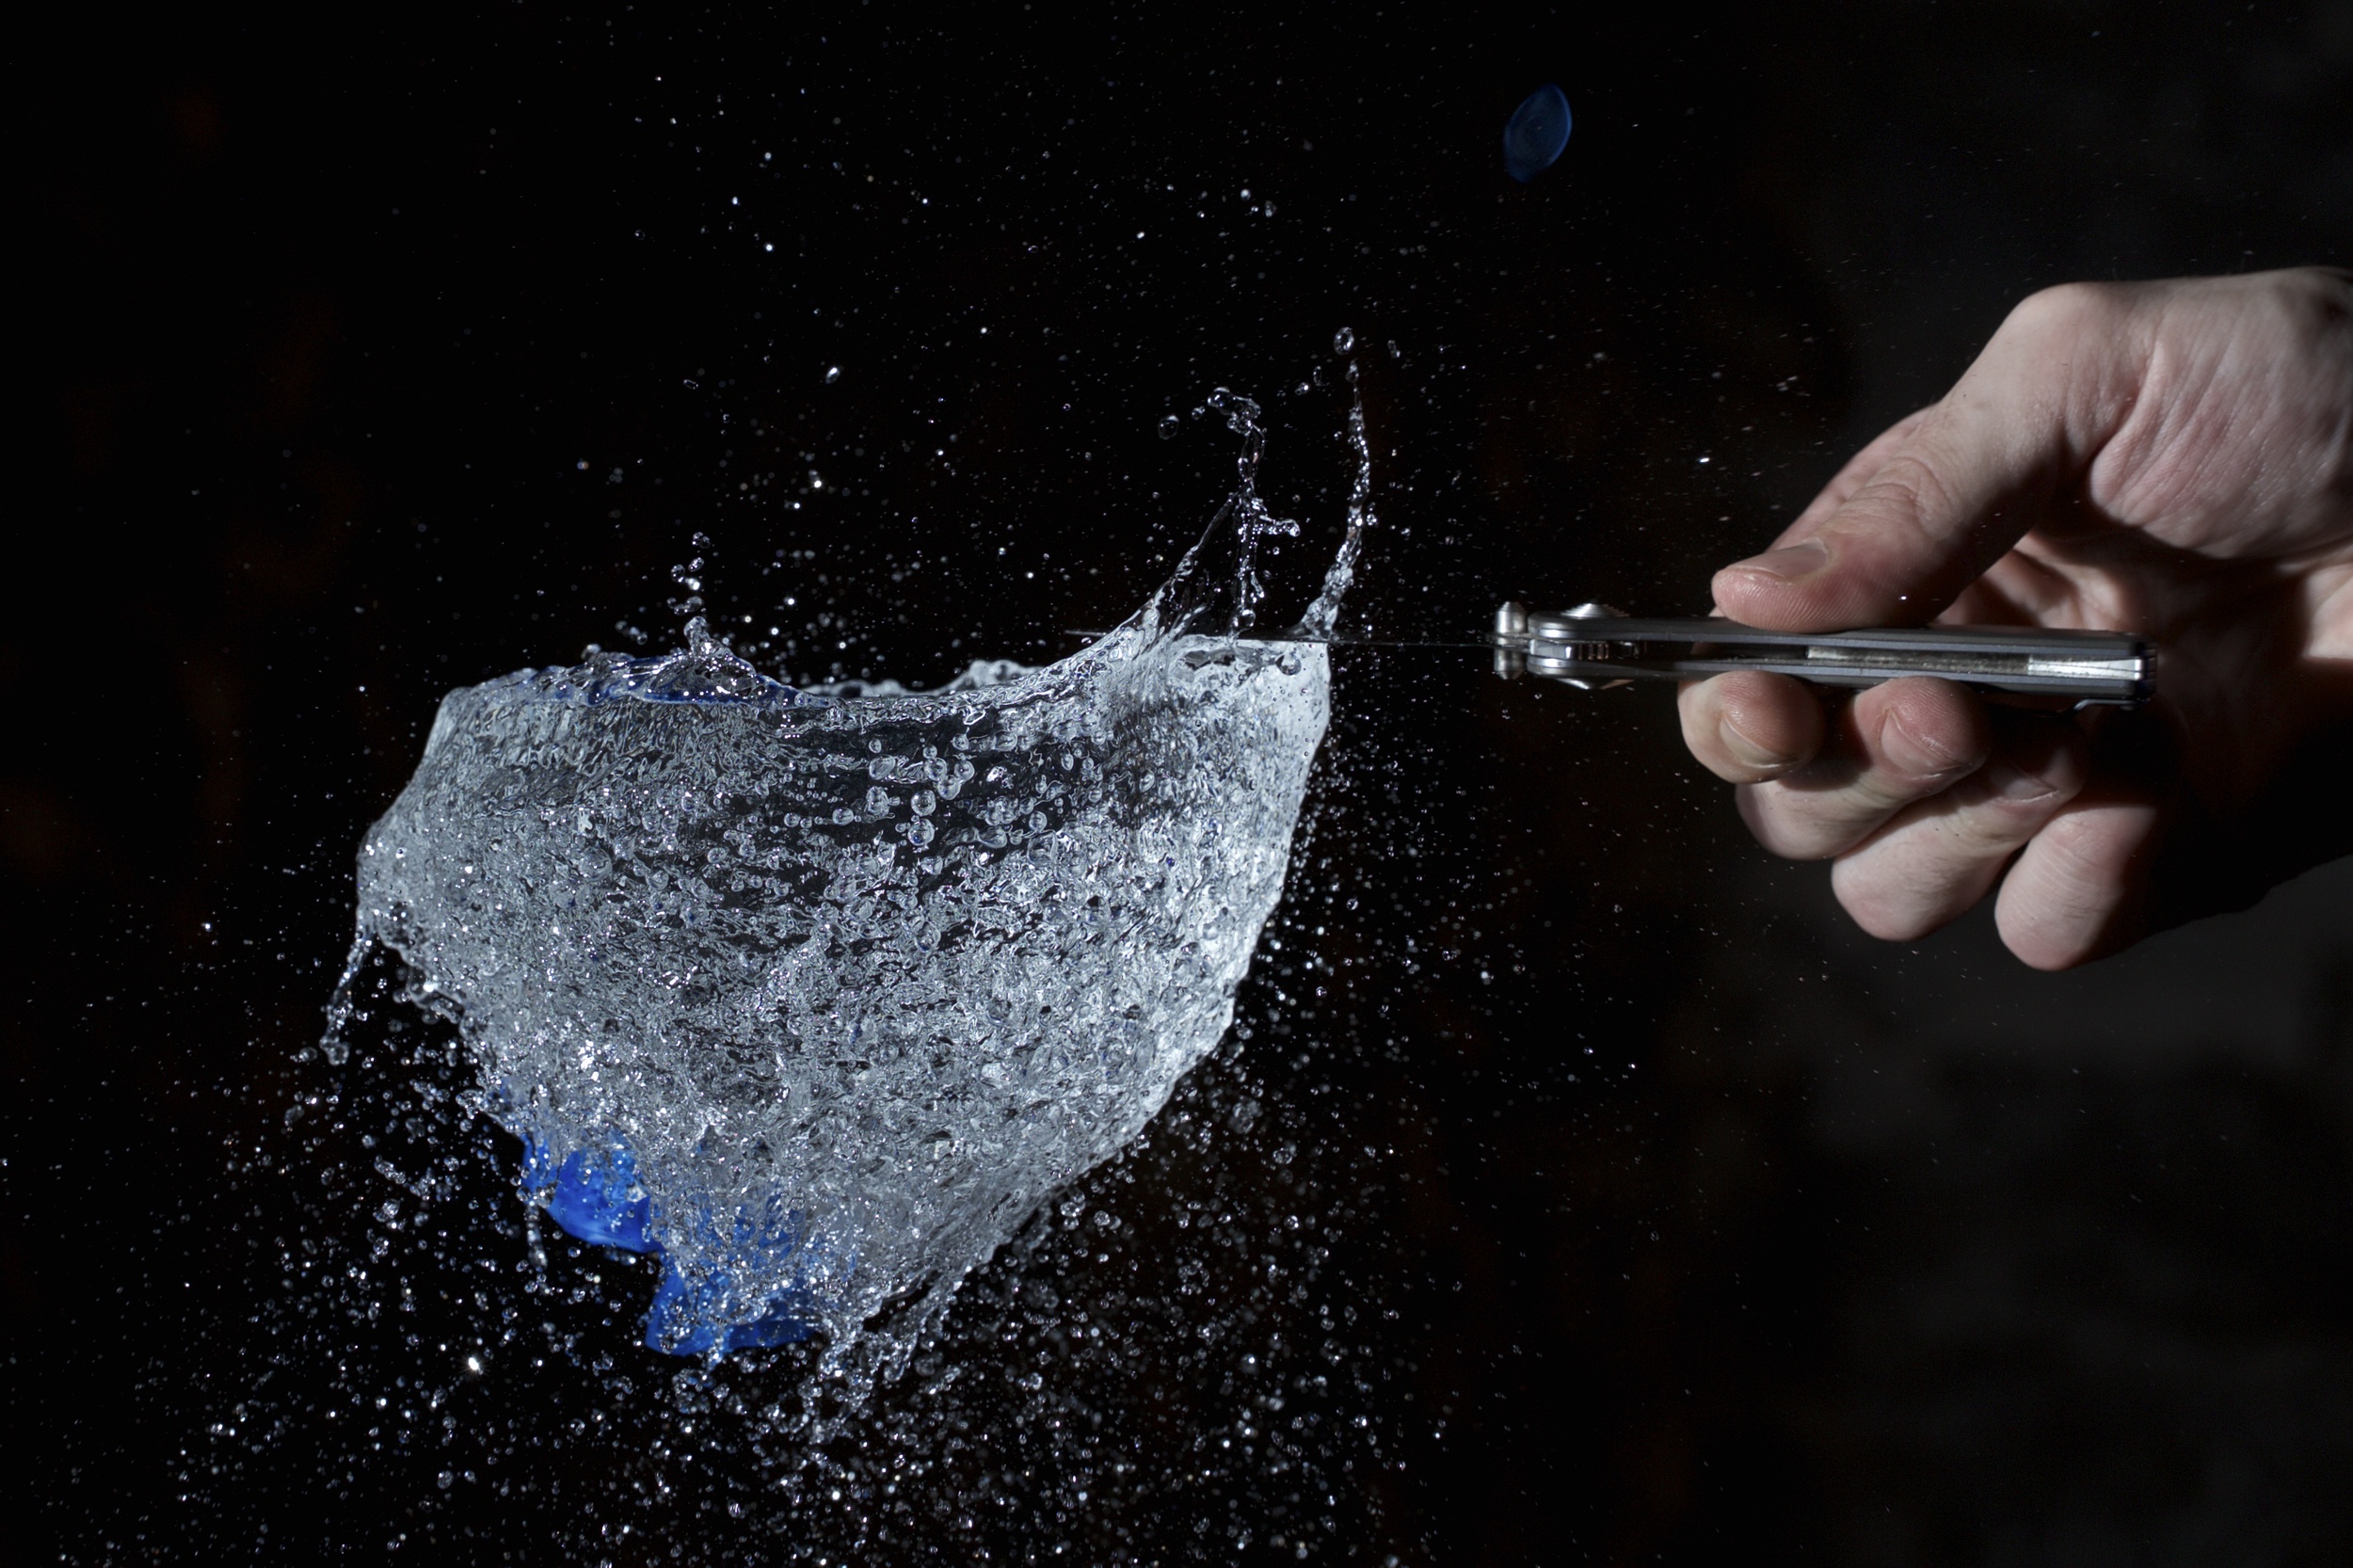
Methodology for initial shots: I used the TriggerTrap device and flash adapter with my Canon 430ex II flash to capture images using sound as the trigger in the mobile app (iPhone 5s). The TriggerTrap app allows the user to adjust the sensitivity to sound to ensure that ambient noise does not trigger the flash. I set my camera (Canon 6d) in manual mode (or bulb mode) ensuring that my exposure is completely black and that all of the exposure will be a result of the flash firing. In some of my initial test shots there was some light spillage that resulted in ghosting; be careful to avoid this. The flash in the images below was on a light stand and was unmodified. I manually set my flash to a low power to ensure a fast flash duration.
(Above Image: Notice the ghosting resulting from ambient light in the scene)
The water balloon photos were created by filling the balloons with water and then blowing a little air in to make certain that a popping noise was created. I then hung the balloons from the basement ceiling and framed the image. I placed the flash on level with the balloon to the left of the camera. Once I had eliminated outside light sources, I experienced a 100% success rate capturing water balloon images. So far I highly recommend TriggerTrap to anyone interested in getting into high-speed photography.
Note: This post only address one of the many functions of TriggerTrap.
(Click image below to cycle through examples of water balloon images created using TriggerTrap)

Creating Long Exposure Light Trails
Asking the right questions to determine your camera settings for creating long exposure light trails
- What is my source of moving light?
- In this case the Buffalo Metro Rail transitioning from underground to aboveground
- Subject moves along a fixed path at regular intervals
- In this case the Buffalo Metro Rail transitioning from underground to aboveground
- What should I be looking for?
- Points of light in the scene
- Lens hoods are recommended
- Does the subject stop, and if so, where?
- Distracting elements
- Streetlights or signs near the edge of the frame
- Strong compositional elements that support the scene
- The arrow in the "All Traffic” sign pointing to the light trail created by the Metro Rail
- Points of light in the scene
- How long will the subject (source of light trails) be in my scene?
- In the case of the example image 10 seconds was appropriate
- What do I want my exposure to be for the ambient scene?
- Remember you have already determined your shutter speed so you will control this with ISO and Aperture
- For this scene an aperture of f/11 was chosen to allow for adequate depth of field and to create starbursts vs. bokeh
- ISO set at 100 to retain maximum image quality
- This was possible due to the amount of artificial street lighting in the scene
- Remember you have already determined your shutter speed so you will control this with ISO and Aperture
Daytime Long Exposures: ND 1000
This shot was taken at 4:15 in the afternoon with a Canon 6d, Sigma 50mm Art, and an Ice 77mm ND1000 Filter. The filter cuts out 10 full stops of light, allowing for the possibility of long (really long) exposures during the daytime. When shooting at f/11 and ISO 100 I needed to use bulb mode with 700-800 seconds of the shutter being open to get correctly exposed images. The filter left a slight purple and blue color cast, which was easy to correct for in post when editing the RAW file.
ISO 100 f/11 700.6s
ISO 51,200 f/3.2 1/160s
Canon EOS 6d High ISO Performance:
ISO 25,600 f/3.2 1/80s
ISO 12,800 f/2 1/125s
These test images are to show real world usability of files shot at high ISO settings on the Canon 6d. No noise reduction was performed on any of the above images. All images were shot handheld with the Sigma 50mm 1.4 Art lens. Increased sharpness over the image shot at 12,800 can be attributed to the aperture being stopped down from f/2 to f/3.2. The sharpness and contrast of the Sigma 50mm 1.4 Art at f/3.2 (f/2.8-f/11) is really incredible, and it's no slouch at wider apertures either!
Instead of using high ISO camera settings I often use a wider aperture, slower shutter speeds, rely on image stabilization (when available), or use a flash. I think these results are quite good, and will not hesitate as often to take advantage of (much) higher ISO settings in the future.
My Photography Gear
I shoot with Canon Cameras. I began learning on a Canon SL1/100d until I upgraded to the full frame Canon 6d. My lens selection includes the EF 100mm f/2.8L macro IS USM, EF 17-40 f/4L USM, EF 40mm f/2.8 STM, and the Sigma 50mm f/1.4 Art. I use the Canon 430 ex II and Yongnuo YN-14EX for my flash needs. To trigger off camera flash I utilize the budget class YN 622c flash triggers with a variety of flash modifiers including a Rogue Flash Bender, umbrellas, and the diffuser function of my 5-1 reflectors. To aid in macro work I use a set of Kenko extension tubes attached to my macro lens. One of my favorite (as well as least favorite to carry) accessories are my tripods. My standard tripod is Promaster XC525 which I purchased at a local photography shop. The GorillaPod Focus with the Ballhead X is what I use most of the time as I can secure it to almost anything and it is great for getting a low perspective. The primary camera bag that I carry equipment in is the Ona Brixton in the smoke color. I also use the Lowepro Hatchback 16L AW if I want to go out with a backpack instead of the messenger bag.